今天來仔細了解一下昨天到底是怎麼設定 Discord BOT 的。
進度
今天會簡單地認識怎麼設定 Discord BOT 的執行腳本 (以 Quickstart 範例程式為例)。
再看一次 Quickstart
昨天我們只有直接執行範例程式,今天讓我們來重新看一下這段程式。
1
2
3
4
5
6
7
8
9
10
11
12
13
14
15
16
17
18
19
20
21
22
|
import discord
intents = discord.Intents.default()
intents.message_content = True
client = discord.Client(intents=intents)
@client.event
async def on_ready():
print(f'We have logged in as {client.user}')
@client.event
async def on_message(message):
if message.author == client.user:
return
if message.content.startswith('$hello'):
await message.channel.send('Hello!')
client.run('your token here')
|
可以大致上把這段程式分成三個階段:
- 建立 Client
- 設定 Client
- 啟用 Client
1. 建立 Client
1
2
3
4
5
6
7
8
9
10
11
12
13
14
15
16
17
18
19
20
| import discord
+ intents = discord.Intents.default()
+ intents.message_content = True
+
+ client = discord.Client(intents=intents)
@client.event
async def on_ready():
print(f'We have logged in as {client.user}')
@client.event
async def on_message(message):
if message.author == client.user:
return
if message.content.startswith('$hello'):
await message.channel.send('Hello!')
client.run('your token here')
|
先前有提過,Discord BOT 其實就跟一般用戶一樣,因此,我們需要建立一個 Client 物件。建立時,有一個必要參數 intents (意思是「意圖」),只有那些有被宣告的「意圖」項目才能在後面使用,相當於控制了這個 Client 物件的權限。
intents 是一個很重要的參數,如果沒有設定好,那麼程式是不會照預期的運作的。舉例來說,如果我們把 intents.message_content = True 這行註解掉 (即「不宣告有讀取訊息的意圖」),執行上面這個 quickstart 時,Discord BOT 是沒辦法對我們發出的訊息做出回應的,同時,程式碼也不會報錯。
intents 的細節明天再仔細說明
2. 設定 Client
1
2
3
4
5
6
7
8
9
10
11
12
13
14
15
16
17
18
19
20
| import discord
intents = discord.Intents.default()
intents.message_content = True
client = discord.Client(intents=intents)
+ @client.event
+ async def on_ready():
+ print(f'We have logged in as {client.user}')
+
+ @client.event
+ async def on_message(message):
+ if message.author == client.user:
+ return
+
+ if message.content.startswith('$hello'):
+ await message.channel.send('Hello!')
client.run('your token here')
|
這部分就是在設定這個 Client 的執行腳本,包含:
- 完成啟動時,在 terminal 印出訊息
We have logged in as 鐵人賽bot#0945
- 當使用者傳送訊息時,如果開頭為
$hello,就回傳 Hello
其中,為了避免 Discord BOT 回應的訊息又再度觸發腳本,強烈建議要加入判斷,如果發送訊息的 Discord BOT 本身就不予回應。
這邊只是很簡單的兩個小腳本,之後會再仔細介紹各種觸發條件與各種回應的方式。
3. 啟用 Client
1
2
3
4
5
6
7
8
9
10
11
12
13
14
15
16
17
18
19
20
| import discord
intents = discord.Intents.default()
intents.message_content = True
client = discord.Client(intents=intents)
@client.event
async def on_ready():
print(f'We have logged in as {client.user}')
@client.event
async def on_message(message):
if message.author == client.user:
return
if message.content.startswith('$hello'):
await message.channel.send('Hello!')
+ client.run('your token here')
|
最後,就是使用 Token 來啟用 Client,讓 Discord BOT 上線。
其他版本的 Quickstart
看完官網上的版本,來看看 Github 上的版本,感受一下不同的寫法。
Quick Example
1
2
3
4
5
6
7
8
9
10
11
12
13
14
15
16
17
18
| import discord
class MyClient(discord.Client):
async def on_ready(self):
print('Logged on as', self.user)
async def on_message(self, message):
if message.author == self.user:
return
if message.content == 'ping':
await message.channel.send('pong')
intents = discord.Intents.default()
intents.message_content = True
client = MyClient(intents=intents)
client.run('token')
|
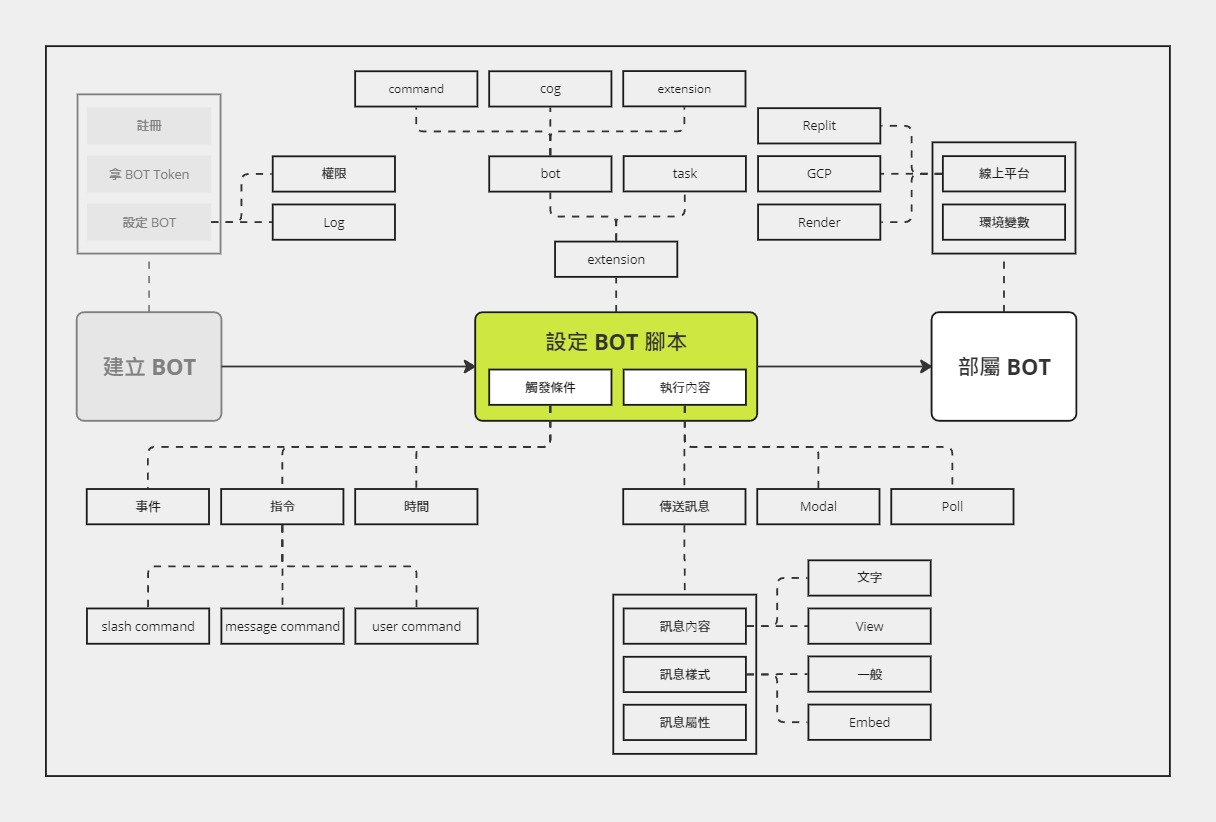
與 Discord BOT 互動:
這個寫法我覺得比較漂亮,它建立了一個新 class MyClient (繼承了 Client),然後把所有腳本都整理在 MyClient 這個 Class 中。如此一來,如果之後有需要,就可以把 MyClient 拆去其他檔案進行管理。
Bot Example
1
2
3
4
5
6
7
8
9
10
11
12
| import discord
from discord.ext import commands
intents = discord.Intents.default()
intents.message_content = True
bot = commands.Bot(command_prefix='>', intents=intents)
@bot.command()
async def ping(ctx):
await ctx.send('pong')
bot.run('token')
|
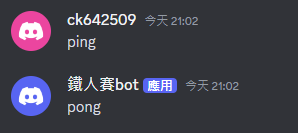
與 Discord BOT 互動:
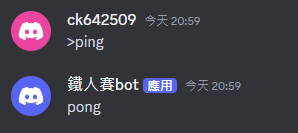
這個寫法更簡潔,不過它有使用到 discord.py 的 Extension,細節等之後再介紹。
更多範例
Github 上有一個 examples 資料夾 (連結),裡面有非常多範例,不過都是比較進階一點的功能,各位新手朋友可以等熟悉 discord.py 後再來觀摩。
小結
今天我們回顧了昨天的 Quickstart 範例程式,了解它到底做了哪些事。明天就會開始仔細介紹比較進階的內容了~